How we made our Jousting Horses.
It is my purpose to describe how Tor an Riogh built
their jousting horses. Gleann Abhann's Knights Marshal then
approved the use of these horses for our event.
Materials
needed for a horse.
![]() 50 Gallon Plastic Drum.
50 Gallon Plastic Drum.
![]() Hand truck with 10"
pneumatic tires
Hand truck with 10"
pneumatic tires
![]() 2 casters with 10" pneumatic
tires
2 casters with 10" pneumatic
tires
![]() 1 sheet of 3/4 Plywood
1 sheet of 3/4 Plywood
![]() Steel Channel 3ft long
Steel Channel 3ft long
![]() 2 X2 Lumber about 8 feet (we used scrap 2X4
and ripped it)
2 X2 Lumber about 8 feet (we used scrap 2X4
and ripped it)
![]() 2X4 Lumber about 8 feet (we used
scrap)
2X4 Lumber about 8 feet (we used
scrap)
![]() 3 cargo straps(ratchet type)
3 cargo straps(ratchet type)
![]() Straw Door mat (half circle for
saddle)
Straw Door mat (half circle for
saddle)
![]() foam rubber (we used cushions off
of a couple of couches we found on the side of the road)
foam rubber (we used cushions off
of a couple of couches we found on the side of the road)
![]() Suede leather
Suede leather
![]() Dry wall Anchors (heavy duty at least 1/4
inch bolt)
Dry wall Anchors (heavy duty at least 1/4
inch bolt)
![]() Duck Tape (lots of it)
Duck Tape (lots of it)
Construction of the horses.
THE HEAD
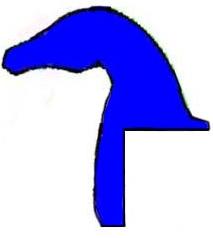 After you have all the material together the
first thing you want to do is to draw the profile of a horse on a
large piece of cardboard. This should also cover the front
shoulder. As you see in the diagram. Cut out the profile and
place it on the plywood. Try to conserve as much wood as
possible. Trace and cut out the profile out of the plywood. Now
you are ready to attach the profile the 50-gallon drum. We found
it easier to do this with the barrel on the hand truck that is
lying down. This keeps the barrel from rolling with you as you
are trying to work on it. To attach the profile to the barrel we
used some pieces of 2x2 as cleats. With the profile held in place
attach one 2x2 to the drums side using dry wall anchors. Make
sure the profile goes through the center of the drum then attach
a 2x2 on the top of the drum Attach the profile to these cleats
then add two more cleats on the other side of the profile. With
the profile mounted it is now time to start making the head look
a little more like a horse. Take the foam rubber (couch cushions)
and trace out the profile on it. You will need 2 profiles per
horse (it took one couch per horse). We found that using an
electric knife was the easiest way to cut it. Put a cushion on
both side of the profile and put a piece of duck tape around it
in a few places just to hold it on. Add a strip of padding at
least one inch thick down the back of the neck over the plywood.
This is to protect the rider if he falls forward (as in a crash).
Now take the duck tape and start at the nose and start raping it
around the profile. Try to make it look like a horse by strapping
it tight were a horse is smaller and looser were the horse is
larger. We add extra padding to make jowls.
After you have all the material together the
first thing you want to do is to draw the profile of a horse on a
large piece of cardboard. This should also cover the front
shoulder. As you see in the diagram. Cut out the profile and
place it on the plywood. Try to conserve as much wood as
possible. Trace and cut out the profile out of the plywood. Now
you are ready to attach the profile the 50-gallon drum. We found
it easier to do this with the barrel on the hand truck that is
lying down. This keeps the barrel from rolling with you as you
are trying to work on it. To attach the profile to the barrel we
used some pieces of 2x2 as cleats. With the profile held in place
attach one 2x2 to the drums side using dry wall anchors. Make
sure the profile goes through the center of the drum then attach
a 2x2 on the top of the drum Attach the profile to these cleats
then add two more cleats on the other side of the profile. With
the profile mounted it is now time to start making the head look
a little more like a horse. Take the foam rubber (couch cushions)
and trace out the profile on it. You will need 2 profiles per
horse (it took one couch per horse). We found that using an
electric knife was the easiest way to cut it. Put a cushion on
both side of the profile and put a piece of duck tape around it
in a few places just to hold it on. Add a strip of padding at
least one inch thick down the back of the neck over the plywood.
This is to protect the rider if he falls forward (as in a crash).
Now take the duck tape and start at the nose and start raping it
around the profile. Try to make it look like a horse by strapping
it tight were a horse is smaller and looser were the horse is
larger. We add extra padding to make jowls. Once you have finished this, fill out his chest with the scrap
foam and duck tape it down. We used just enough duck tape to hold
it in place the covered it with the fabric from one of the
cushions. Use The suede to give the horse some ears and a muzzle,
Sorry No Pattern, but do your best it really helps the
appearance. We also added some large plastic eyes.
Once you have finished this, fill out his chest with the scrap
foam and duck tape it down. We used just enough duck tape to hold
it in place the covered it with the fabric from one of the
cushions. Use The suede to give the horse some ears and a muzzle,
Sorry No Pattern, but do your best it really helps the
appearance. We also added some large plastic eyes.
THE TAIL
With the horse lying on the truck you can see that we
have a little spacing problem. The truck is to long for the
barrel. We fixed this problem by adding a spacer to the rear of
the horse. The spacer was constructed from counter top scraps
(sink cut out, contact your local counter top shop they will have
tons of them.) and 2X4s. You could use the plywood and 2X4 if you
wished. The sink cut outs was cut to match the drum but was left
flat on the bottom to rest against the truck this is to prevent
it from turning. We used three of the sink cut outs and four
2X4s, two between each cut out. Attach two 2X4s to one cut out
with wood screws and then attach it to the barrel using dry wall
anchors. It is important to align the head vertically at this
time because the spacer will prevent it from rotating later.
Attach two more 2X4s to the next cut out and attach to the first
.one so that you have barrel, cut out, 2X4s, cut out, 2x4s. It is
important to note that the 2X4s have to be on different spacing,
or you can't assemble it easily. Attach the last cut out to the
2X4s and our spacer is done. It is important to note that the
size of the space is determined by the length of the hand truck,
you spacer may need to be longer or shorter than ours.
Staple wire fencing (Chicken wire) over the opening so
nothing can get in it. Then add at least an inch of foam rubber
to protect the rider if he falls. We use more fabric from the
cushions to hold the padding in place. Make sure you lap over the
back with the foam and that you can't feel and sharp corners.
With this completed the body of the horse is done. It is time to
make the frame.
THE FRAME
First off let me say that to construct the frame the way we did you will need access to welding equipment, and someone that knows how to use it. The Cart tubing is thin and is difficult to weld without blowing through. For this reason I will discuss another construction method that was used on the First Gleann Abhann jousting horses and the reason we decided to make it the way we did.
The way we did it.
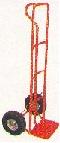 First take
the 24" long channel and weld a 1 ˝" X 4" plate
on each end of the channel. This will increase the strength of
the channel. Now weld the channel to the hand truck. The hand
truck handle must be like the one in the picture. The reason is
the handle is used to attach the pulling rope. Align the channel
across the cart so that the channel is evenly spaced on each
side(flat side is to the cart). The channel goes through the
handle and is attach were the cart straightens out from the curve
at the top. Next weld a caster, one on each end of the channel.
First take
the 24" long channel and weld a 1 ˝" X 4" plate
on each end of the channel. This will increase the strength of
the channel. Now weld the channel to the hand truck. The hand
truck handle must be like the one in the picture. The reason is
the handle is used to attach the pulling rope. Align the channel
across the cart so that the channel is evenly spaced on each
side(flat side is to the cart). The channel goes through the
handle and is attach were the cart straightens out from the curve
at the top. Next weld a caster, one on each end of the channel.
The first horses and why we did it a different way.
The first horses used a 2x4 instead of a steal channel and attached it to the horse with U bolts then attach the caster to it. The reason we went with the channel is that we wanted a more sturdy system. During the first jousting tournament two of the horses collided which caused one of the horses to be damaged and one of the horses had to be taken out of service. So when we built ours we decide to strength the frame. We also made an extra frame incase something happens to one of the horses. This completes construction of the horse. All that is left is the heraldic trapping. The only advice I can give on this is to take a look at the picture I provided and consult your local seamstress.